| Botanical name | Philodendron bipinnatifidum |
|---|---|
| Plant Care |  Full Sun Full Sun – Prefers 6 or more hours of sun per day.  Half Sun Half Sun – Prefers 3 To 6 Hours of Sunlight a Day.  Shade Shade – Prefers Low Light Levels.  Semi Frost Hardy Semi Frost Hardy – Is Able to Survive Moderately Low Temperatures.  Moderate Watering Moderate Watering – Requires Regular Watering.  Low Maintenance Low Maintenance – Requires little maintenance.  Non Indigenous Non Indigenous – Exotic to South Africa. |
| Size | |
| Categories | |
| Common name(s) | Philodendron, lacy tree philodendron, selloum |
| Origin | |
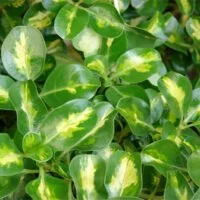
| Foliage | Philodendron selloum has glossy, deeply divided, dark green leaves, segments of which are narrow and toothed. The broad leaves, on long, slender stems, are extremely elegant. |
| Uses in landscape design | Can be used as a solitary specimen. |
| Uses | Use Philodendron in a spacious container, in lobbies. |
| Interesting info | Tolerates frost to -3°C. |
| Other languages | Boomfilodendron (A) |
Philodendron bipinnatifidum (Philodendron, lacy tree philodendron, selloum)

- Botanical name: Philodendron bipinnatifidum
- Common name(s): Philodendron, lacy tree philodendron, selloum
- Categories: Shrubs and Perennials
Plant description:
Strikingly bold, lush foliage makes this an ideal plant where tropical effects are sought. Not unlike the delicious monster (Monsteria deliciosa) in looks, philodendron has glossy, deeply divided, dark green leaves, segments of which are narrow and toothed. The broad leaves, on long, slender stems, are extremely elegant. A wonderful allround shrub, it can be used as a solitary specimen, in a spacious container, in lobbies, on patios or in the garden, in sun or shade. What is more, it tolerates frost to -3°C. P. ‘Xanadu’, a dense, compact shrub that reaches 600mm when fully grown, is excellent for containers on the patio.
Family: Araceae
Synonym: Philodendron selloum
Botanical Pronunciation: fil-oh-DEN-dron by-pin-uh-TIFF-ih-dum
Philodendron bipinnatifidum requirements and features
info on these icons
Moderate Maintenance
Requires moderate maintenance.
Prohibited Use Notice: No Data Scraping Allowed Except for Search Engine Indexing:
The content provided on PlantInfo.co.za is intended for personal, non-commercial use only. Unauthorized extraction, reproduction, or use of the data, including scraping, for any purpose other than search engine indexing is strictly prohibited. Violations of these terms may result in legal action. By accessing and using this website, you agree to comply with these conditions and acknowledge the legal restrictions on the use of our content.
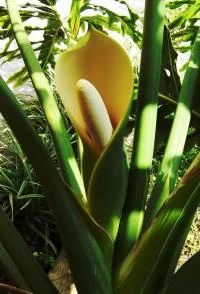
Philodendron selloum has glossy, deeply divided, dark green leaves, segments of which are narrow and toothed. The broad leaves, on long, slender stems, are extremely elegant.

How to Transplant Philodendron bipinnatifidum (Philodendron Selloum)
Transplanting a Philodendron bipinnatifidum, commonly known as Philodendron Selloum, can be done successfully with the right timing and care. This large, leafy tropical plant is fairly hardy but doesn’t appreciate being disturbed too often, so transplant only when necessary—typically when it becomes root-bound or needs a better location in your garden.
When to Transplant
- Best Time: Early autumn or spring, when temperatures are moderate.
- Avoid: Extreme heat or cold, as this can stress the plant unnecessarily.
How to Transplant
1. Choose a Suitable Spot
Select a partially shaded location that receives filtered sunlight or morning sun. Avoid harsh afternoon sun, which can scorch the leaves.
2. Prepare the New Hole
Dig a wide hole in advance—at least twice the width and the same depth as the root ball. Enrich the soil with compost or well-rotted manure to support healthy root development.
3. Water the Plant Before Uprooting
Water your Philodendron thoroughly the day before transplanting. This helps reduce transplant shock and makes the roots easier to lift.
4. Uproot Carefully
Gently dig around the plant, keeping as much of the root ball intact as possible. Use a spade or garden fork to loosen the soil, then lift the plant from beneath.
5. Replant Promptly
Place the plant in the prepared hole and backfill with soil, firming it gently around the base. Ensure the plant sits at the same depth it was growing previously.
6. Water Well
Soak the soil thoroughly after planting to help settle the roots and remove any air pockets.
7. Mulch and Maintain
Add a layer of organic mulch around the base to retain moisture and regulate soil temperature. Keep the plant well-watered (but not soggy) for the first few weeks while it establishes.
Extra Tips
- If the plant is very large, consider cutting back some of the larger leaves to reduce stress on the roots during transplanting.
- Don’t fertilise immediately after transplanting. Wait 3–4 weeks before feeding to allow the plant time to settle.
- If transplanting into a pot, choose a large container with drainage holes and a rich, well-draining potting mix.
Related plants
Shrubs and Perennials
Shrubs and Perennials
Shrubs and Perennials
Shrubs and Perennials

Shrubs and Perennials

Shrubs and Perennials
Shrubs and Perennials