How to Grow Carrots in South Africa
In the rich tapestry of South African landscapes, gardening is not just a hobby; it’s a deep-rooted connection to the land and a journey towards self-sustainability. Among the array of vegetables that thrive in South African gardens, the humble carrot holds a special place. So How to grow carrots? Let’s have a detailed look.
Preparing Your Garden for Planting Carrots
Before you embark on your carrot-growing journey, you need to prepare your garden. South Africa’s diverse climates demand careful planning. Here’s how to get started:
Carrot Soil Requirements:
Carrots require specific soil conditions to grow well. Carrot plants require the correct soil pH, structure, and some amendments for the best results an healthy carrot plants.
Soil pH for Carrots: Carrots typically thrive in slightly acidic to neutral soils with a pH level between 6.0 and 7.0.
Soil Structure for Healthy Carrots: Mix a good dose of compost into your soil before planting carrots. Carrots need loose, well-draining soil to grow straight and unimpeded. Sandy loam soils are ideal for carrots, but in regions where the soil is clay-heavy, you should amend it with organic matter to improve its structure and drainage.
Feed Your Soil for Carrots: To enrich the soil, add well-rotted compost or aged manure. These organic materials increase nutrient levels and improve soil structure, providing a better environment for carrot roots to develop. In some regions, you might also need to incorporate additional nutrients based on a soil test, as South Africa’s diverse climates can influence soil composition and nutrient availability.
Selecting the Ideal Location for Planting Carrots:
The location of your carrot garden is crucial for its success.
Sunlight: Carrots are sun-loving plants and generally require at least 6 hours of direct sunlight per day. However, in extremely hot regions, providing some partial shade during the hottest part of the day can prevent the soil from drying out too quickly and causing the carrots to become tough and bitter. Consider the specific climate of your area and adjust your garden’s location accordingly.
Consider Raised Beds for Carrots: In regions with clay-heavy or waterlogged soils, raised beds can provide better drainage and aeration. They also make it easier to control the soil composition and ensure it meets the ideal pH and nutrient levels for carrots.
When is the Best Time to Plant Carrots:
Plant Carrots in Spring:
- In regions with cold winters, the best time to plant carrots is in early spring. You can sow carrot seeds as soon as the soil can be worked, typically a few weeks before the last expected frost date in your area. This allows for a spring and early summer harvest.
Plant carrots in Autumn:
- In regions with mild winters or areas where frost is less of a concern, you can also plant carrots in late summer or early autumn. This planting window, usually from late summer to early fall, allows for a late autumn and winter harvest.
Soil Temperature: Carrots germinate best when the soil temperature is around 10-30°C. They can tolerate cooler temperatures, but germination may be slower in colder soils.
Frost Tolerance: Carrots are frost-tolerant, and they can continue to grow during mild winter conditions. However, if you expect severe frost in your area, it’s a good idea to protect your carrot crop with row covers or mulch.
Successive Planting: To enjoy a continuous harvest, you can plant carrots successively every few weeks during the appropriate planting seasons. This way, you can have a fresh supply of carrots throughout the growing season.
How to Plant Carrot Seeds – Step by Step
Step 1 Determine Spacing for Planting Carrot Seeds:
Start by determining the recommended spacing for the specific carrot variety you’re planting. This information is usually found on the seed packet. Carrot seeds should typically be sown about 5 cm apart in rows.
Step 2 Prepare Rows for Planting Carrot seeds:
Using a garden rake, hoe, or any suitable garden tool, create rows in your prepared planting area. The rows should be shallow furrows, providing a straight guideline for planting the seeds.
Step 3 Evenly Distribute Carrot Seeds:
Gently sprinkle the carrot seeds into the furrows. The key here is to ensure even distribution, which will result in evenly-spaced and well-sized carrots. Take your time during this step to prevent overcrowding. A good tip is to mix your seed with fine sand before sowing, this will help you spread the seed more evenly.
Step 4 Covering the Carrot Seeds:
How deep should carrot seeds be planted? After sowing the carrot seeds, it’s time to cover them with a thin layer of soil. The ideal depth is about 6-13 mm. This depth ensures the seeds are appropriately buried while not being too deep for the young seedlings to emerge.
Step 5 Pat Down the Soil and Firm Carrot Seeds Into Place:
Use your hands or a gardening tool to lightly pat down the soil. This will help establish good seed-to-soil contact, aiding germination. This is important to make sure the carrot seeds are firmly in contact with the soil.
Step 6 Watering and Carrot Seed Aftercare:
Immediately after sowing the carrot seeds, it’s crucial to water the area thoroughly. This initial watering helps settle the soil around the seeds and initiates the germination process. Keep the soil consistently moist but avoid overwatering, which can lead to seed rot.
Step 7 Thinning the Carrot Seedlings:
As the carrot seedlings emerge and develop their first true leaves, you’ll need to thin them to ensure proper spacing. Thinning out carrot seedlings is a critical when growing carrots from seed, as overcrowded seedlings can result in small, misshapen carrots. Aim for a spacing of 5-7.5 cm between individual carrot seedlings.
In conclusion, with attention to detail, proper spacing, and adequate care, you can look forward to a healthy and bountiful carrot harvest. This brings you one step closer to enjoying the satisfaction of homegrown carrots in your culinary creations. So, get those seeds in the ground and watch your carrot garden come to life.
How to Grow Carrots in Containers:
1. Select the Right Container:
a. Container Depth: Carrots are known for their long taproots, which can extend deep into the soil. To accommodate this root system, it’s essential to choose a container with ample depth. A minimum depth of 30 cm is recommended for carrots. Deeper containers provide more space for the roots to develop without constraints, resulting in healthier and larger carrots.
b. Proper Drainage: Good drainage is vital for growing healthy carrots. Containers must have drainage holes to prevent water from accumulating in the bottom. Waterlogged soil can lead to root rot and other moisture-related issues. Ensure that your container has adequate drainage to allow excess water to escape.
2. Pick the Right Carrot Variety for Containers:
a. Shorter Carrot Varieties: Carrot varieties come in different sizes, and for container gardening, it’s advisable to choose shorter or baby carrot varieties. These varieties are specially bred for small spaces and tend to have smaller root systems. Some examples of shorter carrot varieties suitable for containers include ‘Little Finger,’ ‘Thumbelina,’ and ‘Paris Market.’
3. Use Quality Potting Mix To Grow Carrots in Containers:
a. Drainage and Soil Texture: Carrots thrive in well-draining, loose soil. Select a high-quality potting mix that provides good drainage. Look for mixes designed for container gardening or vegetables. Avoid heavy, compacted soils that can hinder root growth.
b. Lightening Dense Mixes: If the potting mix you choose is too dense, you can improve its aeration and drainage by adding washed riversand or perlite. Mix these amendments thoroughly into the potting mix before planting your carrot seeds. This will create a more suitable growing medium for carrots.
4. Sow Carrot Seeds in Container:
a. Seed Spacing: When sowing carrot seeds in your container, follow the recommended seed spacing provided on the seed packet. Typically, this spacing is around 2 inches (5 cm) apart. Adequate spacing is essential to prevent overcrowding, which can lead to small or misshapen carrots.
b. Proper Seed Placement: Gently press the carrot seeds into the potting mix to ensure good seed-to-soil contact. This helps with germination and encourages the seeds to establish healthy roots. Firm but gentle pressure is key to avoid burying the seeds too deeply.
c. Depth of Planting: Cover the carrot seeds with a thin layer of soil, typically about 6-13 mm deep. Avoid burying them too deeply, as young carrot seedlings may struggle to break through the soil surface if it’s too compacted.
Caring for Carrot Plants – How to Look After Carrots
Ensuring the health and vitality of your carrots through the growing season is crucial for a successful harvest.
1. Maintaining Soil Moisture :
Provide Consistent Moisture: Carrots thrive when the soil is kept consistently moist, but not waterlogged. It’s essential to monitor the moisture levels regularly. Carrots are sensitive to drought stress, which can lead to poor root development and an increase in the likelihood of cracked or misshapen carrots. During dry spells, be diligent about watering to maintain the right moisture balance.
Deep Watering: When you do water, provide deep and thorough irrigation to encourage carrot roots to grow deeper into the soil. Shallow, frequent watering can lead to shallow root development.
Use a Soaker Hose: To ensure even moisture distribution and prevent disturbing the soil surface, consider using a soaker hose or drip irrigation system to water your carrots.
2. Mulching Carrots:
Mulch Selection: Applying a layer of mulch, such as straw, grass clippings, leaves, or garden mulch, around your carrot plants has multiple benefits. It helps retain soil moisture by reducing evaporation, ensuring that the root zone remains consistently damp. Additionally, mulch serves as a natural weed barrier, reducing competition for nutrients and moisture.
Apply Mulch Carefully: When applying mulch, be sure not to cover the young carrot seedlings. Leave a small space around the base of the plants to allow them to breathe and receive sufficient sunlight.
3. Carrot Pest and Disease Management:
Regular Inspections: Vigilance is key to managing pests and diseases. Regularly inspect your carrot patch for signs of trouble. Look for common carrot pests like aphids, carrot rust fly larvae, and nematodes. Also, be on the lookout for any disease symptoms such as leaf blights or fungal issues.
Early Intervention: If you identify any pests or diseases, take appropriate measures promptly. Depending on the issue, this may involve handpicking pests, applying organic pest control solutions, or, in severe cases chemical treatments.
4. Protect Carrot Plants From Extreme Heat:
Shade Provision: In regions experiencing extreme heat, especially during the peak of summer, consider providing partial shade for your carrot bed during the hottest part of the day. This can be achieved using shade cloth or even by planting taller companion plants that provide natural shading. Excessive heat can cause the soil to dry out quickly, affecting carrot growth and quality.
Common Carrot Pests and Diseases in South Africa
South African gardeners face their share of challenges when cultivating carrot crops. Pests and diseases can pose a threat to the success of your garden, but with the right knowledge and proactive measures, you can effectively manage these issues. Here’s an exploration of some common carrot pests and diseases found in South Africa and the methods to identify and address them:
1. Aphids on Carrots and Their Control:
Identification: Aphids are small, soft-bodied insects that can vary in color, including green, black, or orange. They often cluster on the leaves and stems of plants, including carrot greens. These pests feed on plant sap, which can lead to stunted growth and the transmission of plant viruses.
Control: Controlling aphids in your South African garden can be achieved through organic methods. Here are some strategies to consider:
- Handpicking: Inspect your carrot plants regularly and physically remove aphids by gently squishing them or spraying them off with a strong stream of water.
- Companion Planting: Some companion plants, like marigolds or nasturtiums, can deter aphids from your carrot patch.
- Neem Oil or Insecticidal Soap: These natural products can be applied to control aphid infestations effectively.
2. Protection Against Carrot Rust Fly:
Identification: The carrot rust fly is a small fly that lays its eggs near the base of carrot plants. The larvae that emerge from the eggs tunnel into the carrots, making them unfit for consumption. Signs of infestation include wilting, yellowing, or stunted growth of carrot greens.
Preventive Measures: Protecting your carrot crop from the carrot rust fly is crucial. Here are some preventive measures to consider:
- Crop Rotation: Avoid planting carrots in the same location in consecutive years, as this can help disrupt the life cycle of the pest.
- Covering with Row Covers: Use row covers to physically block the adult flies from laying their eggs on the carrot plants.
- Diatomaceous Earth: Apply food-grade diatomaceous earth around your carrot plants, which is abrasive and can deter adult flies from landing and laying eggs.
3. Combatting Damping Off on Carrots:
Identification: Damping off is a fungal disease that primarily affects young carrot seedlings. Symptoms include the sudden wilting, yellowing, and collapse of seedlings. The disease often occurs in damp or poorly drained soil.
Prevention and Management: To protect your young carrot plants from damping off, follow these preventive measures:
- Well-Drained Soil: Ensure your garden soil is well-draining, as excess moisture contributes to the disease’s development.
- Proper Seed Spacing: Adequate spacing between carrot seeds and proper thinning can improve air circulation and reduce the risk of infection.
- Sterile Seed-Starting Mix: When starting seeds indoors, use a sterile seed-starting mix to reduce the chances of fungal contamination.
- Fungicide Treatment: In severe cases, consider using an appropriate fungicide, but always follow the product’s instructions.
4. Whiteflies on Carrots:
Whiteflies can be a persistent and troublesome pest for carrot growers in South Africa. These small, winged insects can inflict damage by feeding on the sap of carrot leaves, leading to yellowing, wilting, and the potential transmission of plant viruses. Here’s how to identify and address whiteflies in your carrot garden:
Identification: Whiteflies are tiny, white insects that often cluster on the undersides of carrot leaves. When disturbed, they quickly fly into the air, creating a cloud of small, white bugs. The presence of sticky honeydew and the growth of black sooty mold on the leaves are indicators of their presence.
Control: Controlling whiteflies can be challenging, but there are several methods you can employ to manage their populations effectively:
- Yellow Sticky Traps: Hang yellow sticky traps in your garden to attract and capture whiteflies. These traps can help reduce their numbers.
- Pruning Infested Leaves: Remove and dispose of heavily infested carrot leaves to reduce the whitefly population. Make sure to do this carefully to avoid further spreading the pests.
- Neem Oil or Insecticidal Soap: Apply neem oil or insecticidal soap to the carrot plants, focusing on the undersides of the leaves where whiteflies congregate. These natural products can help control the infestation.
5. Nematodes on Carrots:
Nematodes are microscopic roundworms that can be a significant problem for carrot growers in South Africa. These parasites can attack the roots of carrot plants, leading to stunted growth, wilting, and root deformities. Here’s how to identify and address nematodes in your carrot garden:
Identification: Nematode infestations are often identified by the following symptoms:
- Stunted growth and yellowing of carrot plants.
- Galls or knots on the roots, where nematodes have fed and reproduced.
- Poor root development, with small, malformed, or discolored carrots.
Control: Managing nematodes in your carrot garden can be challenging, but there are strategies you can employ to mitigate their impact:
- Crop Rotation: Avoid planting carrots in the same location for consecutive years. Rotate your crops to disrupt the nematode life cycle and reduce their population.
- Marigold Companion Plants: Marigolds are known to release compounds that can suppress nematode populations. Plant marigolds as companion plants in your carrot garden.
Harvesting and Storing Your Carrots
After weeks of nurturing your carrot plants, the day finally arrives when you can reap the rewards of your hard work. Harvesting and storing your homegrown carrots is a pivotal moment in your gardening journey. To fully enjoy the flavor and quality of your carrots, it’s crucial to know when and how to harvest them and then store them properly. Let’s dive into the details of these important processes:
When to Pick and Harvest Carrots:
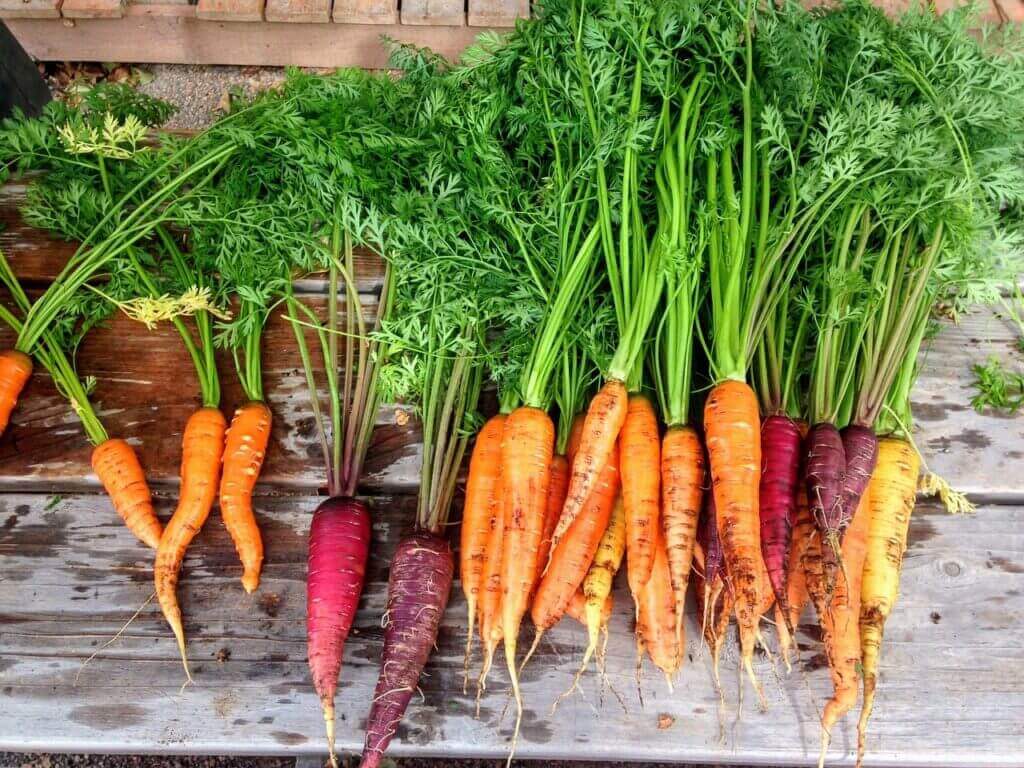
Timing is Everything: Determining the right time to harvest your carrots is essential for achieving the best flavor and texture. Carrots are typically ready for harvesting 60-80 days after planting, but the exact timing can vary based on the carrot variety and growing conditions. To know when your carrots are ready, look for the following signs:
- Carrot shoulders are breaking through the soil surface.
- A vibrant orange color (or the specific color of the carrot variety you planted).
- A healthy size to pick your carrots is usually around 1.3-2.5 cm in diameter.
How to Pick and Harvest Carrots:
When your carrots are ready, it’s time to carefully extract them from the soil. Here’s how to do it without damaging the roots:
- Gently loosen the soil around the carrot with a hand trowel or fork, being cautious not to damage the root.
- Grasp the carrot near the root crown and pull it out slowly. If you encounter resistance, gently wiggle the carrot to release it from the soil without breaking the root.
- Remove excess soil by shaking the carrot gently, avoiding scrubbing, which can damage the delicate skin.
How to Store Carrots:
Once you’ve harvested your carrots, the next crucial step is storing them properly to maintain their freshness and crispness. The storage method you choose will depend on the equipment and facilities available to you:
Refrigerator: Store carrots in the crisper drawer, preferably in a perforated plastic bag to maintain humidity. Ensure the temperature is set between 0-4°C
Other Storage Options: You can store carrots in a cool, dark place in the house, such as a basement or pantry, preferably in a container filled with damp sand or peat moss to keep humidity levels stable.
Companion Plants When Growing Carrots
Companion planting is an effective way to improve the health and yield of your carrot crop while deterring pests and promoting overall garden harmony.
Companion plants to grow with carrots:
Here are some suitable companion plants for carrots in South Africa:
Grow these plants to improve your carrots.
- Chives: Chives help deter aphids and carrot rust flies, making them excellent companions for carrots. Plus, their onion-like scent can confuse pests.
- Lettuce: Planting lettuce alongside carrots can help provide some shade to the carrots during the hot South African summer, preventing the soil from drying out too quickly.
- Marigolds: Marigolds are known for their pest-repelling properties. They can deter nematodes, aphids, and other harmful insects while attracting beneficial pollinators to your garden.
- Onions and Garlic: Onions and garlic help deter pests like aphids and carrot flies. Their strong odor can mask the scent of carrots, making it harder for carrot flies to locate them.
- Radishes: Radishes are often suggested as a companion plant for carrots because they mature quickly and help break up the soil, allowing carrots to grow more easily.
- Nasturtiums: Nasturtiums not only add color to your garden but also act as a trap crop for aphids, which are drawn to their leaves rather than your carrots.
- Basil: Basil is believed to improve the flavor of nearby crops, including carrots. It can also deter various pests like aphids, making it a beneficial companion plant.
- Dill: Dill can attract beneficial insects such as ladybugs and parasitic wasps, which help control pest populations in your garden.
- Tansy: Tansy has a reputation for repelling pests like ants, aphids, and flying insects. It can be a valuable companion to carrots.
- Beans: Some gardeners interplant bush beans with carrots, as the two can complement each other. The beans fix nitrogen in the soil, benefiting the carrots, and the carrots can help provide some shade to the beans.
Dont grow these plants with carrots
Here are some plants that are generally considered poor companions for carrots:
Potatoes: Carrots and potatoes are both root crops, and planting them together can lead to competition for nutrients and space. Potatoes may also release chemicals that inhibit the growth of carrots and other nearby plants.
Parsnips: Parsnips are closely related to carrots and may be susceptible to the same pests and diseases. Planting them together can lead to a higher risk of infestations.
Dill: While dill can be a beneficial companion in some cases, it’s not recommended as a companion for carrots. Dill can attract carrot flies, which are a common pest for carrots.
Fennel: Fennel can interfere with the growth and flavor of nearby plants, including carrots. Additionally, fennel is known to attract aphids, which can harm your carrot crop.
Anise: Similar to fennel, anise can negatively affect the growth and flavor of carrots and may attract pests like aphids.
Coriander (Cilantro): Coriander can release chemicals that inhibit the growth of nearby plants, including carrots.
Rosemary: Rosemary has allelopathic properties that can hinder the growth of many plants, including carrots.
Tomatoes: Tomatoes are known to attract aphids and other pests. While they may not harm carrots directly, planting them near carrots could increase the risk of pest infestations in your garden.
Brassicas (Cabbage, Broccoli, Cauliflower): These crops are susceptible to similar pests as carrots, such as root-knot nematodes. Planting them together can lead to the multiplication of these pests and potentially harm both crops.
Cucumbers: Cucumbers can be aggressive growers and may compete with carrots for space, light, and nutrients. Additionally, they can attract pests like aphids and spider mites.
Popular Questions When Growing Carrots
How long does a carrot take to grow?
The time it takes for carrots to grow depends on various factors, including the carrot variety, weather conditions, and local climate. On average, carrots take approximately 70 to 80 days to reach maturity. However, some early varieties can be ready for harvest in as little as 50 to 60 days, while larger, main-season carrots may take longer, up to 90 days or more. It’s essential to consult the specific information on the seed packet for the variety you choose, as this will provide a more accurate estimate for your particular growing conditions.
How do you grow carrots from carrots?
Growing carrots from carrots involves regrowing new plants from carrot tops or remnants. Keep in mind that you can only grow seeds and carrot tops if you plant a carrot. To grow carrots from carrots, you will need to wait for the plant to seed and then plant those carrot seeds again.
Regrowth: Over time, new carrot greens will emerge from the top, and you can continue to harvest them as needed. However, please note that regrowing carrots from carrot tops may not produce full-sized carrots but can provide you with fresh carrot greens for garnishes or salads.
Can you grow carrots in winter?
Yes, you can grow carrots in the winter, depending on your climate and local conditions. Carrots are cool-season vegetables and can tolerate cold temperatures. In regions with mild winters, you can sow carrot seeds in the late summer or early fall for a winter harvest. Using cold frames, row covers, or mulch can help protect the carrots from freezing temperatures.
How long can you leave carrots in the ground?
Carrots can be left in the ground for an extended period as long as the soil does not freeze and the ground remains unfrozen. This allows you to harvest them as needed over an extended period. However, leaving them in the ground for too long may result in over-mature carrots that could become woody or develop a stronger flavor. It’s best to harvest them when they reach the desired size, but you can leave them in the ground until you’re ready to use them.
Can I grow carrots all year?
In regions with mild climates and no severe winter freezes, you can potentially grow carrots year-round. By succession planting at appropriate times, you can have a continuous harvest. In areas with harsh winters, growing carrots year-round may be challenging without the use of protective structures like cold frames or greenhouses.
Can you grow carrots anytime?
Carrots can be grown during specific seasons, primarily in the spring, summer, and fall. The ideal time for planting depends on your local climate and weather conditions. In colder regions, spring and fall are the primary growing seasons for carrots. In milder climates, you may be able to grow them during the winter as well.
Why won’t my carrots grow?
Several factors can hinder carrot growth, including:
- Soil Issues: Poor soil quality, heavy clay, or compacted soil can restrict root growth.
- Inadequate Thinning: Overcrowded carrot seedlings can lead to stunted growth and misshapen roots.
- Inconsistent Moisture: Irregular watering can result in issues like cracking, forking, or slow growth.
- Pest or Disease Damage: Carrot pests and diseases, such as carrot rust flies or fungal infections, can damage or slow down growth.
To troubleshoot growth issues, ensure proper soil preparation, adequate spacing, consistent moisture, and protect your crop from pests and diseases.
How do you know when to pull your carrots?
Carrots are typically ready to harvest when they reach the desired size, usually around 70-80 days after sowing. To determine if they are ready, gently pull one carrot from the ground. If it’s the size you desire and the color is vibrant, you can begin harvesting. Carrots can be left in the ground longer if needed, but over time, they may become over-mature, potentially becoming woody or developing a stronger flavor. Therefore, regular checks for size and quality are recommended during the growing season.
Conclusion on How To Grow Carrots
By understanding the soil, climate, and techniques that work best in your specific region of South Africa, you can enjoy a bountiful harvest of homegrown carrots. With attention to detail, proper care, and the right companion plants, your garden can flourish, and you can savor the satisfaction of fresh, flavorful carrots straight from your own backyard.
So, whether you’re growing carrots in your garden or in containers on your balcony, the process is a rewarding one. With patience, dedication, and a little green-thumb magic, you’ll soon be enjoying the sweet, crisp crunch of South African homegrown carrots in your favorite dishes.
Happy gardening, and may your carrot patch thrive!


